Integrations
Access to Memory (AtoM)
Soteria+ integrates with AtoM, an open-source archival description management system, to allow you to upload your content into AtoM and link it to descriptive records. This integration allows you to search for and connect your content to existing archival descriptions directly from Soteria+, offering a more direct and efficient workflow for your archival descriptions.
- A correctly configured AtoM site (see intructions below).
- Administrative access to your organisations AtoM site, or help from someone who does.
- An account on your organisations Soteria+ Enterprise system with a user-admin tier role.
- The URL of your AtoM site.
- 1-2 hours of time.
Setting up AtoM
Setting up AtoM (AtoM Self-Hosted)
To connect your Soteria+ instance to AtoM, you will first need to follow the standard installation instructions for AtoM (see AtoM installation instructions). Once AtoM is installed, you will need to correctly configure AtoM to enable the Sword API (see AtoM Sword API configuration). Once AtoM is installed and configured, please proceed to the following section connecting to AtoM
NB: the configuration steps reference ArchivematicaTM, but the same process can be used with Soteria+. Please see the above warning for more information about configuring SSH keys between Soteria+ and AtoM.
Explanation
Soteria+ takes advantage of the Sword protocol to communicate with AtoM. This protocol allows AtoM to receive and process dissemination packages (DIPs) directly from Soteria+. The sword API is the mechanism AtoM internally uses to communicate DIP processing requests with its companion digital preservation system, ArchivematicaTM. This enables Soteria+ to streamline the process of uploading content into AtoM, and then linking it to existing archival descriptions.
Setting up AtoM (AtoM Hosted by your Soteria+ Provider)
If you are using AtoM hosted by your Soteria+ provider, you will need to contact your provider to discuss the creation of SSH keys between your Soteria+ and AtoM instances. If you are a new customer looking to integrate AtoM with Soteria+, please contact your Soteria+ provider during your onboarding process to inform them of your requirement and the connection will be ready for you when you are given access to the system. If you are an existing customer who is now looking to integrate a hosted AtoM site with Soteria+, please create a support ticket and a representative will be in touch to configure the connection. Once you have access to your AtoM instance, proceed to the following section connecting to AtoM.
Connecting to AtoM.
Once you have completed the configuration steps for your AtoM instance, you will need to create an AtoM user that Soteria+ can use to make requests to your AtoM instance and store the required details in the AtoM connection menu inside Soteria+.
The required details are:
- AtoM URL
- Username
- Password
- AtoM API Key
Please follow the linked instructions to create an AtoM user with at least the "Editor" role, though "Administrator" is recommended. You may need to contact your AtoM administrator if you do not have sufficient privileges to create a user account. (see AtoM Add a New User).
You can name this user whatever you like, but it is recommended that you give it a descriptive name that indicates its purpose. For example, you could name it "Soteria+ AtoM User".
Next, you will need to generate an API key for your AtoM user. You can do this by following the instructions in the AtoM API Key section of the AtoM user manual.
Once you have completed these steps, log in to your user-admin Soteria+ account and open the AtoM connection menu by clicking on your user avatar in the top left-hand corner of the Soteria+ interface (it's the same menu you log-out from) and selecting "Connect to AtoM".
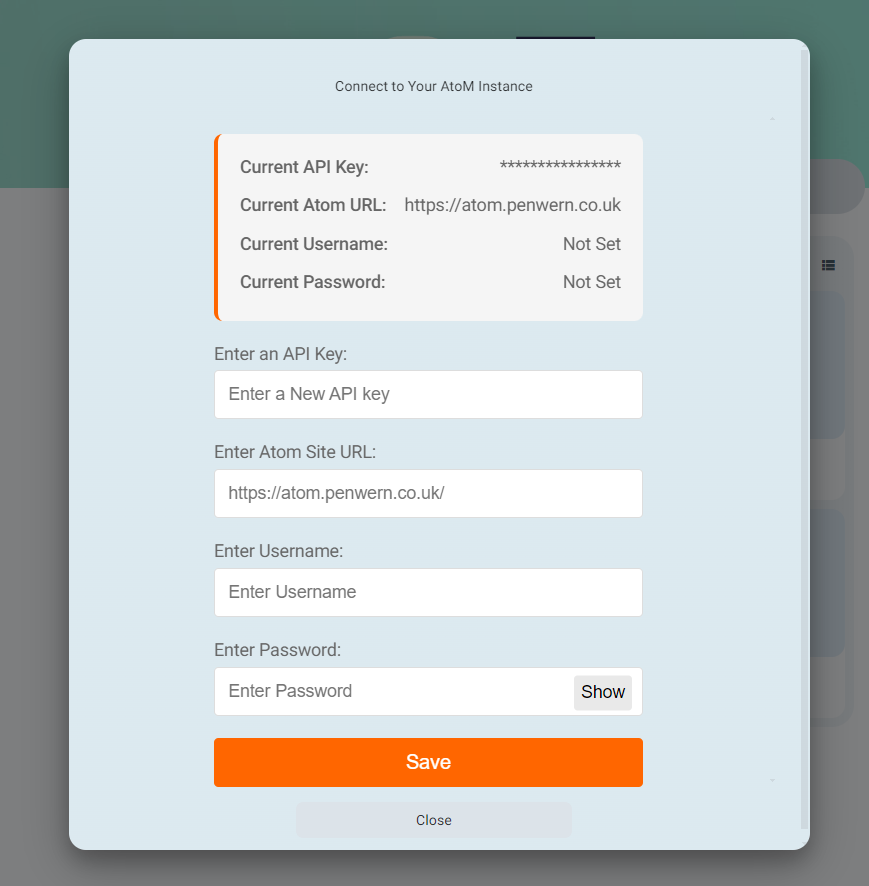
Next, enter the details you've gathered in the previous steps into the appropriate fields. Once you have entered all of the required details, click "Save" to save your connection details. This information is encrypted in transit by the SSL protocol and is securely stored in your Soteria+ database. Only an organisational user-admin can access or update this information.
Once you have configured AtoM and entered the required details, you're all done! You can now start using AtoM with Soteria+. Proceed to the next section for usage instructions Sending DIPs to AtoM.
Sending DIPs to AtoM
If you have not yet configured AtoM, please follow the instructions in the previous sections Setting up AtoM before proceeding.
Soteria+ makes the process of generating dissemination packages (DIPs) and sending them to AtoM simple and requires no additional modification of your preservation configurations. The first step is to link an object or hierarchy of objects that you would like to generate a DIP from to an existing AtoM description.
Linking an object or hierarchy of objects to an existing AtoM description
To link an object or hierarchy of objects to an existing AtoM description, you can either:
- Select a single object or hierarchy of objects, select the "more" menu in the main file-list control bar and then click the "Link to AtoM Description" button. This will open a dialog box that allows you to search for an existing AtoM description and link the selected object(s) to it.
- Select multiple objects or hierarchy of objects, select the "more" menu in the main file-list control bar and then click the "Link to AtoM Description" button. This will open a dialog box that allows you to individually link each object to an existing AtoM description. Clicking the "Link" button will open the AtoM description search dialog box and allow you to search for an existing AtoM description and link the selected object to it. Once you have selected an existing AtoM description, you will be moved back to the first dialog box with your multiple object selection and you can continue to link the remaining objects.
Once you have linked your objects to an existing AtoM description, you will see a tag with the prefix "linked description" next to the object in the file-list that records the slug of the linked description.
Generating a DIP
Once you have linked an object or hierarchy of objects to an existing AtoM description, you can generate a DIP for it by selecting the object or hierarchy of objects, right clicking and clicking the "Preserve" button. Soteria+ analyses each of your selected objects and generates a DIP when it finds a selection with a suitable linked description. It will then automatically generate a DIP during the preservation workflow and send it to AtoM for processing. Whilst the preservation workflow is running, you will see a status tag appear next to the object in the file-list that records the status of the DIP generation and processing.
Once your objects have been successfully preserved, you will see the "preserved" status tag appear next to the object in the file-list. This means Soteria+ has generated both an AIP and a DIP for the object, and that the DIP has been sent to AtoM for processing.
ArchivesSpace
Soteria+ integrates with ArchivesSpace, an open-source archival management system, to support a linked preservation workflow. From within Soteria+, you can browse your ArchivesSpace repositories, navigate archival hierarchies, and select a record to link to. Soteria+ then creates a folder linked to that ArchivesSpace record. When the folder is later preserved, Soteria+ automatically writes digital object instances back into ArchivesSpace, representing the preserved content and associating it with the relevant archival description.
- A Soteria+ account on a system where the ArchivesSpace integration has been enabled by your administrator.
- Access to the ArchivesSpace repositories you wish to link to.
Launching the ArchivesSpace Browser
The ArchivesSpace browser is accessed from the main file list in Soteria+.
- Navigate to the folder in Soteria+ where you want the linked folder to be created.
- Click the "More" button in the file list toolbar (the toolbar above your files and folders).
- Select "Link ArchivesSpace folder" from the menu that appears. The ArchivesSpace browser will open.
Browsing ArchivesSpace
The browser opens on the Browse tab, which is organised into three levels. You navigate through them in sequence to find the archival record you want to link to.
Repositories
The first level shows all available repositories as cards, each displaying the repository's name, code, location, and number of collections. Click a repository card to view its collections.
Collections
The second level shows the collections within the selected repository. Each card displays the collection's title, identifier, date range, and extent. Click a collection card to open its archival hierarchy.
Archival hierarchy
The third level displays the records within the collection as a tree. Click the arrow beside any record to expand its children and explore the hierarchy. Click a record to select it and view its details in the panel on the right-hand side of the browser.
Searching and Filtering
Searching within a collection
When viewing a collection's archival hierarchy, use the search box at the top of the browser to find records by keyword. Matching records are highlighted in the tree and shown as a list. Use the navigation arrows (showing your current position, e.g. 3/42) to step through search results.
By default, searches look across all fields. Click the dropdown to the left of the search box to restrict the search to a specific field, such as title, identifier, or status.
Global search
To search across all repositories without navigating the hierarchy first, use the Search tab at the top of the browser.
Filtering
Click the Filters button to refine the results shown. Available filters are:
- Level – Show only records at a particular archival level (e.g. Collection, Series, File, Item).
- Status – Show only records with a particular condition or access status: Available, Needs Attention, or Restricted.
- Scope (when searching within a hierarchy) – Limit the search to the subtree of the currently selected record, rather than the entire collection.
- Advanced – Enter custom filter criteria using ArchivesSpace Lucene filter syntax.
Active filters are shown as chips below the search bar. Click the × on a chip to remove that filter, or use the Clear button inside the filters panel to remove all active filters at once.
Tree and flat list views
When browsing a collection hierarchy, use the Tree and Flat buttons in the top-right of the browser to toggle between a hierarchical tree view (the default) and a flat list view of all records in the collection.
Selecting Records
Click any record in the tree or flat list to select it. The record's details will appear in the panel on the right.
To select multiple records, use the checkbox on each record. Your selection count is shown at the top of the detail panel. Use the carousel arrows in the detail panel to move through your selections and review each one. To remove a record from your selection, uncheck it. To clear your entire selection, use the Clear button in the detail panel.
Creating a Linked Folder
Once you have selected one or more records, configure the options in the detail panel and click Create Folders. Soteria+ will create the linked folder or folders in the location you navigated to before opening the browser. When a folder is later preserved, Soteria+ will automatically update ArchivesSpace with digital object instances representing the preserved content.
Detail level
The detail level controls how the preserved files within a folder will be represented in ArchivesSpace after preservation.
- Per File (default) – Each file within the preserved folder receives its own representation in ArchivesSpace. There are two sub-options for how these per-file representations are organised:
- Components (default) – All file representations are grouped together as components of a single digital object. This keeps the ArchivesSpace record compact, with all files together under one entry.
- Records – Each file receives its own independent digital object, linked directly to the archival record. Choose this option if each individual file represents a distinct intellectual item.
- All Records – All preserved files are represented by a single digital object in ArchivesSpace, regardless of how many files the folder contains. Choose this option when the folder as a whole, rather than its individual files, is the meaningful unit of description.
Container type
The container type controls which ArchivesSpace record the preserved content is linked to.
- Digital Object (default) – Digital object instances are linked directly to the archival record you selected.
- Archival Object – A new item-level archival record is created as a child of the record you selected, and digital object instances are linked to that new record instead. Use this option when you want the preserved folder to be represented as a new, distinct level of description within your archival hierarchy. When this option is selected, you can enter a name in the Folder name field to use as the title of the new archival record; if left blank, the folder's name in Soteria+ will be used.
What appears in ArchivesSpace after preservation
Once a linked folder has been preserved, Soteria+ automatically updates the corresponding ArchivesSpace record. What you will see in ArchivesSpace depends on the options you chose when creating the folder:
- Digital Object container (default): One or more digital objects appear as instances on the archival record, with links pointing back to the preserved content in Soteria+. The number and structure of those digital objects reflects the detail level you selected.
- Archival Object container: A new item-level record appears as a child of the original archival record, and the digital objects are linked to that new record rather than the original.
If a preserved folder is re-preserved, Soteria+ will update the existing ArchivesSpace records rather than creating duplicates.
Single Sign-On
Soteria+ provides a complete embedded user authentication solution with an internal user directory that should be sufficient for most business cases. However, if you wish to use an external identity provider, such as Google, Microsoft Entra or LDAP, you can do so by configuring your Soteria+ instance to use SSO.
Soteria+ offers several single sign-on (SSO) options for your users. This means that you can log in to Soteria+ using your existing identity provider (IdP) and have your user details automatically populated into Soteria+. This is particularly useful for organisations that have a central identity provider such as an LDAP server, Google Accounts or Microsoft Entra, and want to allow their users to log in to Soteria+ with the same credentials they use for your other systems or services.
Microsoft Entra (formerly Azure AD)
Microsoft Entra is a cloud-based identity provider that allows you to manage your users and their identities in a single place. Many organisations already use Microsoft Entra to manage their users.
The setup in this section uses OpenID Connect (OIDC). If your organisation requires SAML 2.0 instead, follow the SAML 2.0 guide, which includes a separate Microsoft Entra walkthrough.
This guide attempts to provide a comprehensive walkthrough for setting up Soteria+ with Microsoft Entra as your IdP. If you would like to read additional information about Entra or would like an additional resource to guide you through this process, please visit the Microsoft Documentation for setting up Entra app registrations: Microsoft Entra app registration documentation
If you are using Microsoft Entra as your IdP, you will need to follow the steps below to enable Soteria+ to use it as your SSO provider.
- Administrative access to your Entra ID tenant (with at least a "Cloud Application Administrator" role), or help from someone who does.
- Assistance from the Soteria+ support team to enable Entra ID as an identity provider for Soteria+.
- 15-20 minutes of time.
Registering Soteria+ as an Application in Entra
To use Microsoft Entra as your SSO provider, you will first need to register Soteria+ as an application in your Microsoft Entra tenant. To do so, you will need to follow the steps below:
-
Log in to your Entra ID as an administrator and access the Entra admin center (see Entra admin center).
-
Use the settings icon in the top menu to switch to the tenant (where applicable) you would like to register the application from.
-
Expand the Identity section in the left-hand menu
-
Expand the Applications section and select App registrations option.
-
Select "New registration" from the top menu.
-
Enter a descriptive display name for Soteria+ in the "Name" field. This can be whatever you like, but it's recommended that you use one similar to "Soteria+" or "Soteria+ Enterprise".
-
Select the supported account types for Soteria+. This should generally be "Accounts in this organizational directory only (Microsoft only - Single tenant)" for most configurations. If you are unsure what to select or believe you may require a different option, please contact support for assistance unless you are absolutely sure.
-
Configure the callback URL (optional):
-
You can at this point choose to add the callback URL for your Soteria+ instance, or you can leave this blank for the time being.
- If you do add a callback URL, you will need to configure your logout URL in the next section.
-
If you are unsure, please leave this option blank and follow the instructions in the next section.
-
Select "Register" to create the application.
Configuration Details
| Field | Required Value | Notes |
|---|---|---|
| Name | "Soteria+" or "Soteria+ Enterprise" | Choose a descriptive display name |
| Supported account types | "Accounts in this organizational directory only (Microsoft only - Single tenant)" |
For most configurations. Contact support if unsure. |
| Redirect URI (optional) | https://www.exampleinstance.com/auth/login/entra/callback | Replace with your actual Soteria+ instance URL |
Next Steps
After completing the registration process, you will need to proceed with the following steps:
- Generating a Client Secret
- Configuring Soteria+ to use Entra as an Identity Provider
- Testing your Entra Configuration
Generating a Client Secret
Once you have registered your Soteria+ application, you will need to generate a client secret for your application registration. To do so, you will need to follow the steps below:
-
Log in to your Entra ID as an administrator and access the correct tenant in the Entra admin center if you have not already done so (see Entra admin center).
-
Expand the Identity section in the left-hand menu
-
Expand the Applications section and select App registrations option.
-
Select the application registration we setup in the previous section
-
Select "Certificates & secrets" under the "manage" menu which can be found in the left-hand menu in the application registration details page.
-
Select "New client secret", which will appear above the empty list of client secrets.
-
Enter a descriptive name for your client secret in the "Name" field. This can be whatever you like, but it's recommended that you use one similar to "Soteria+" or "Soteria+ Enterprise".
-
Select a sensible expiry date for your client secret. This is the period after which your client secret will expire and become inoperable and you will need to repeat both these and the following section of steps to restablish your SSO connection with Entra.
-
Select "Add" to create the client secret.
Once your client secret has been created, you will need to copy it to your clipboard. This is the only time you will be able to see the client secret, so make sure you copy it now.
It's also a good idea to record your client ID so you don't have to dig through the Entra admin center to find it again for the next section.
Configuring Soteria+ to use Entra as an Identity Provider
Next, you will need to gather the following information from Entra so that Soteria+ can connect to your new app registration:
Application (client) ID: This is the unique identifier for your application registration. This value is commonly referred to as the client ID in the OAuth2 protocol, but is also known as the Application ID in the Microsoft Identity platform. You can find this value in the application registration details page.
Client Secret: the secret value we generated in the previous section that allows Entra to verify your Soteria+ instance.
Tenant ID: This is a unique identifier for your Entra ID tenant. You can find this value in the Entra admin center by expanding the "Identity" section in the left-hand menu and selecting "Overview" from the menu that appears. Please be careful to collect the ID for the correct tenant that we registered our Soteria+ application in.
Once you have gathered these necessary details, you will need to deliver them to Soteria+ support so that they can configure your Soteria+ instance to use Entra as an identity provider. The best way to do this is to send them in an email to the support team.
In order to send your Entra details to Soteria+ support securely, you will first need to encrypt the details using our public GPG key. If you are a new customer, please notify us of your requirement for Entra ID as an identity provider during your onboarding process, and you will be provided with a GPG key for encryption. If you are an existing customer who is now looking to integrate Entra ID with Soteria+, please create a support ticket and a representative will be in touch to configure the connection.
Once you have received the public PGP key, you will need to encrypt your Entra details using a tool like:
Gpg4win (Windows)
- Includes GnuPG for Windows, Kleopatra certificate manager, and GPA (GNU Privacy Assistant)
- User-friendly graphical interface
GPG Suite (macOS)
- Integrates with macOS Mail and includes GPG Keychain for key management
- Provides a smooth, native macOS experience
GnuPG (GNU Privacy Guard)
- Available for Windows, macOS, and Linux
- Command-line tool, but forms the basis for many graphical front-ends and is used by default in many Linux distributions and is often the quickest way to get started with GPG
Once you have encrypted your Entra details, you can then send them in the encrypted file to support via email. The Soteria+ support team will acknowledge the reception and be able to decrypt the details and configure your Soteria+ instance to use Entra as an identity provider.
At this point, if you decided to add the callback URL in the previous section, you will need to configure your logout URL in your Entra application registration. If you elected to leave the callback URL blank, you will need to configure both the callback URL and the logout URL. To do so, you will need to follow the steps below:
-
Log in to your Entra ID as an administrator and access the correct tenant in the Entra admin center if you have not already done so (see Entra admin center).
-
Expand the Identity section in the left-hand menu
-
Expand the Applications section and select App registrations option.
-
Select the application registration we setup in the previous section
-
Select "Authentication" under the "manage" menu which can be found in the left-hand menu in the application registration details page.
-
Select "Add a platform" under the "Platform Configurations" section.
-
Select "Web" from the "Configure platforms" menu that appears on the right hand side of the screen.
-
Enter the callback URL for your Soteria+ instance in the "Redirect URI" field. This should be the URL of your Soteria+ instance with the path "/auth/sso/callback/microsoft-entra". For example, if your Soteria+ instance is at https://www.exampleinstance.com, then your callback URL would be https://www.exampleinstance.com/auth/sso/callback/microsoft-entra.
-
Select "Add platform" to add the callback URL.
-
You will see a new "Web" platform configuration in the "Platform Configurations" section which will list the callback URL you added in the previous step.
-
Under the platform configuration, you will see a "Logout URL" field. Enter the URL of your Soteria+ instance with the path "/logout". For example, if your Soteria+ instance is at https://www.exampleinstance.com, then your logout URL would be https://www.exampleinstance.com/logout.
-
You MUST then select both "Access tokens" and "ID tokens" under the "Implicit grants and hybrid flows" section. If you do not select these options, you will not be able to log in to your Soteria+ instance using Entra.
-
Select "Save" to save your changes.
Testing your Entra Configuration
Once you have configured your Soteria+ instance to use Entra as an identity provider, you can test your configuration by logging in to your Soteria+ instance using an account that has been conferred access to the application registration that we set up in the previous sections. Federation of who in your organisation can access your Soteria+ instance is managed by your Entra ID tenant, so you will need to ensure that your account has been conferred access to the Soteria+ application registration.
Soteria+ currently uses an honesty policy to ensure that you do not exceed your alloted quota of user licenses. This is because accounts within Soteria+ are automatically created for new users at the point that they sign-in with their Entra details, and we do not require you to provide a list of users who you would like to access the application. This ensures you encounter minimal resistance when trying to onboard new/additional staff members into Soteria+.
If you have exceeded your quota, support will get in touch with your organisation to discuss your options. If you are unsure of your user quota or would like to add additional user licenses to your contract, please contact support.
If you do have a specific list of users that you would like to grant access to your Soteria+ instance and want to prevent other users from accessing it, you can do so by using Microsoft Entra administration features like security groups. If your organisational structure or Entra setup prohibits you from doing this, you can contact support with your list of users and we will restrict access from any other user accounts.
At this point, you can log in to your Soteria+ instance using the account that has been conferred access to the Soteria+ application registration:
-
Navigate to your Soteria+ instance. If you are not already logged in, you will be prompted to log in with one of the provided authentication options.
-
Select "Microsoft Entra" from the list of authentication options.
-
You will be redirected to the Entra ID login page. This will appear exactly as it does when you sign-in to any of your other connected services.
-
Enter your Entra ID credentials and select "Sign in".
-
You will be redirected back to your Soteria+ instance home space.
All done! You can now start using your Soteria+ instance with Entra. If you would like to configure security groups, please refer to the Security section of the User Guide.
Using Security Groups with Entra to Manage User Permissions
Security groups provide a centralised and scalable approach to managing user permissions within Soteria+. By creating groups in Microsoft Entra ID and mapping them to specific roles or permissions in Soteria+, organisations can streamline user access management while maintaining granular control over system capabilities.
This integration enables self-service permission management, reducing the need for support requests when adjusting user access. You can implement either role-based or permission-based approaches depending on your security requirements and organisational structure.
Permission Management Strategies
You can implement security group mappings using two primary approaches:
Role-Based Mapping: Create groups that correspond to complete Soteria+ roles such as "Contributor" or "Administrator." This approach simplifies user management by assigning comprehensive permission sets through a single group membership.
Granular Permission Mapping: Create groups that map to specific permissions such as "Read" or "Write" access. This approach provides maximum flexibility, allowing you to construct custom roles by combining multiple group memberships.
Configuration Process
The initial configuration of security group mappings requires coordination with Soteria+ support. Once established, your organisation can independently manage group memberships through the Entra ID administrative interface.
Implementation Steps
1. Create Security Groups in Entra ID
Begin by establishing the necessary security groups within your Entra ID environment:
- Access the Entra admin center and navigate to Identity > Groups > All Groups
- Select New Group to initiate group creation
- Configure the group properties:
- Group Name: Use a descriptive name that clearly indicates the group's purpose (e.g., "Soteria+-Contributors" or "Soteria+-ReadOnly-Access")
- Description: Provide a comprehensive description that explains the group's intended use and associated permissions
- Group Type: Select "Security" from the dropdown menu
- Configure group membership:
- You may add users immediately during group creation or manage memberships later
- Consider implementing dynamic membership rules if your organisation structure supports automated user assignment
-
Critical: Record the Object ID for each created group, as this unique identifier is required for the mapping configuration
-
Configure Groups Claim in Application Registration Configure your Entra ID application registration to include security group information in authentication tokens:
-
Navigate to your Soteria+ application registration in the Entra admin center
- Select Token configuration from the left-hand menu
- Click Add groups claim to create a new groups claim
- In the groups claim configuration:
- Select Security groups to include security group memberships in tokens
- Under the ID section, enable Emit groups as role claims to ensure proper integration with Soteria+'s permission system
Save the configuration to apply the changes
2. Request Security Group Mapping Configuration
Contact Soteria+ support to establish the connection between your security groups and Soteria+ permissions:
- Provide Group Details: Submit the Object IDs for all security groups requiring mapping
- Define Permission Requirements: Clearly articulate your desired permission structure. Given Soteria+'s extensive permission framework, we recommend discussing your specific use cases with our support team to optimise your configuration
- Collaborative Configuration: Work with Soteria+ support to finalise the most effective permission mapping strategy for your organisational needs
- Implementation: Once approved, Soteria+ support will implement the security group mappings in your environment
3. Verification and Activation
Upon completion of the mapping configuration, user permissions will be automatically managed through group membership:
- Users who are members of mapped security groups will receive the associated permissions automatically upon signing in through Entra SSO
- Permission changes can be managed by modifying group memberships within Entra ID
- New users can be granted appropriate access by adding them to the relevant security groups
Ongoing Management
After initial setup, your IT administrators can manage user permissions entirely through Entra ID group memberships, providing a streamlined and auditable approach to access control within Soteria+.
SAML 2.0
Soteria+ can use a SAML 2.0-compatible identity provider (IdP) for single sign-on. SAML 2.0 is an open standard, so this option can be used with Microsoft Entra ID and other compatible identity providers such as Okta, Google Workspace, Active Directory Federation Services (AD FS) and Shibboleth.
Every identity provider presents its configuration differently. This guide therefore explains the information that must be exchanged for any SAML 2.0 connection, followed by a complete example using Microsoft Entra ID. If you use another identity provider, your identity administrator can use the same Soteria+ service provider values with that provider's SAML documentation.
- Administrative access to your identity provider, or help from someone who has it.
- Assistance from the Soteria+ support team to enable SAML 2.0 and provide the settings for your Soteria+ instance.
- A test user account that you can grant access to Soteria+.
- 30-45 minutes of time.
How the SAML 2.0 Setup Works
In a SAML connection, Soteria+ is the service provider (SP) and your authentication system is the identity provider (IdP). Each side needs information about the other before it can trust and process sign-in messages.
The setup is completed in the following order:
- Contact Soteria+ support to request SAML 2.0 SSO.
- Soteria+ support provides the callback URL and Entity ID for your Soteria+ instance.
- Create a SAML 2.0 application in your identity provider, using the callback URL as both the SP Entity ID and ACS URL unless support instructs you otherwise.
- Provide Soteria+ support with your IdP login URL, signing certificate and claim names.
- Soteria+ support completes the connector and confirms that it is ready to test.
- Test the connection with a non-administrative user before making it available more widely.
The following values are exchanged during setup:
| SAML term | Microsoft Entra field | Purpose |
|---|---|---|
| Soteria+ callback URL | Reply URL (Assertion Consumer Service URL) | The Soteria+ endpoint to which the identity provider sends its SAML response. |
| Soteria+ Entity ID | Identifier (Entity ID) | Identifies Soteria+ in the authentication request. Soteria+ support will normally supply the callback URL as this value. |
| IdP SSO URL | Login URL | The identity provider endpoint to which Soteria+ posts its authentication request. |
| IdP signing certificate | Certificate (Base64) | Allows Soteria+ to verify the signature on the SAML response. |
| Username and email claim names | Attributes & Claims | Tells Soteria+ which values in the SAML response identify the user. |
The login URL and signing certificate are not client secrets or passwords. However, send configuration details using the support channel agreed during setup and never send a user's password or an unredacted SAML response by email.
Setting up SAML 2.0 in Microsoft Entra
Microsoft Entra configures SAML applications under Enterprise applications, rather than by creating the type of App registration used in the preceding Microsoft Entra guide. The current Microsoft instructions are available in Enable SAML single sign-on for an enterprise application.
1. Request the Soteria+ Service Provider Settings
Contact Soteria+ support and request SAML 2.0 SSO for your Soteria+ instance. If you are a new customer, you can do this during onboarding. If you are an existing customer, create a support ticket.
Support will create or prepare the connection and provide the Soteria+ callback URL and Entity ID. The callback URL will normally have the following form:
https://<your-curate-domain>/auth/login/<connector-id>/callback
Soteria+ support will normally ask you to use this exact URL as both the Identifier (Entity ID) and Reply URL (ACS URL) in Entra. Always use the values supplied by support.
2. Create a Non-gallery Enterprise Application
-
Log in to Microsoft Entra as an administrator and open the Microsoft Entra admin center. You will normally need at least the Cloud Application Administrator or Application Administrator role.
-
Switch to the correct tenant, where applicable.
-
Navigate to Entra ID > Enterprise apps > All applications.
-
Select New application.
-
Select Create your own application.
-
Enter a descriptive name, such as "Soteria+ SAML" or "Soteria+ Enterprise SAML".
-
Select Integrate any other application you don't find in the gallery (Non-gallery).
-
Select Create.
For more information about this process, see Add an enterprise application in Microsoft Entra.
3. Configure SAML Single Sign-on
-
Open the enterprise application you created in the previous section.
-
Select Single sign-on from the left-hand menu.
-
Select SAML as the single sign-on method.
-
In Basic SAML Configuration, select Edit.
-
Enter the callback URL supplied by Soteria+ support:
-
In Identifier (Entity ID), enter the complete Soteria+ callback URL.
- In Reply URL (Assertion Consumer Service URL), enter the same complete Soteria+ callback URL.
- Leave Sign on URL empty unless Soteria+ support supplied a separate value.
-
Leave Relay State and Logout URL empty unless Soteria+ support supplied values for them.
-
Select Save.
4. Configure User Attributes and Claims
-
On the Set up Single Sign-On with SAML page, locate Attributes & Claims and select Edit.
-
Locate the additional claims whose source values are
user.userprincipalnameanduser.mail. -
Record the complete Claim name shown for each one. Soteria+ needs the claim name from the left-hand column, not the Entra source value from the right-hand column.
For a default Entra SAML application, the mappings are normally:
| Soteria+ field | Entra source value | Default Entra claim name |
|---|---|---|
| Username attribute | user.userprincipalname |
http://schemas.xmlsoap.org/ws/2005/05/identity/claims/name |
| Email attribute | user.mail |
http://schemas.xmlsoap.org/ws/2005/05/identity/claims/emailaddress |
If your tenant shows different claim names, record and provide the exact names displayed in your tenant. You do not need to add replacement claims when the existing claims supply the correct username and email values.
The identifier you choose must be present for every user who will sign in and should remain stable. Do not assume that user.mail and user.userprincipalname contain the same value in your tenant. If Soteria+ uses an email address to identify an account, confirm which Entra attribute reliably contains that address for all intended users.
Microsoft provides additional guidance for diagnosing missing or incorrectly formatted attributes in Troubleshoot SAML application sign-in.
5. Collect the Microsoft Entra Login URL and Certificate
-
Return to the Set up Single Sign-On with SAML page for your enterprise application.
-
In the section headed Set up [application name], copy the Login URL. It normally resembles
https://login.microsoftonline.com/<tenant-id>/saml2. -
In the same section, copy the Microsoft Entra Identifier. It normally resembles
https://sts.windows.net/<tenant-id>/. -
Locate SAML Certificates and download Certificate (Base64).
-
Send Soteria+ support:
-
The Login URL.
- The Microsoft Entra Identifier.
- The downloaded Base64 certificate file.
- The complete username and email claim names recorded in the previous section.
The App Federation Metadata URL and Federation Metadata XML contain much of the same information, but please send the individual values and certificate listed above unless Soteria+ support requests the metadata instead.
6. Grant a Test User Access
-
In the enterprise application, select Properties.
-
Decide whether Assignment required? should be enabled. Enabling it restricts sign-in to users or groups explicitly assigned to the application and is recommended when only selected people should have access to Soteria+.
-
Select Save if you changed the setting.
-
Select Users and groups from the left-hand menu.
-
Select Add user/group.
-
Select a test user, then select Select and Assign.
Group-based assignment requires an appropriate Microsoft Entra licence and does not include members of nested groups. For more information, see Manage users and groups assigned to an application.
7. Test the Connection
Keep an existing Soteria+ administrative session open in a separate browser while testing, so that you retain access if the SAML configuration needs to be corrected.
-
Open a private or incognito browser window.
-
Navigate to your Soteria+ instance and select the SAML sign-in option configured for your organisation.
-
Sign in with the Entra test user that you assigned to the application.
-
Confirm that the user is returned to Soteria+ and that the correct existing account is used, or that a new account is created as agreed with Soteria+ support.
-
Confirm that the user's name, email address and permissions are correct.
-
Sign out, then sign in again to confirm that the same Soteria+ account is used.
If sign-in fails, record the time of the attempt, the user account, the Entra error code or Soteria+ error message, and the Entra correlation and request IDs where available. Send these details to Soteria+ support; do not send the user's password or an unredacted SAML response by email.
Once testing succeeds, assign the remaining users or groups that should have access. Soteria+ accounts and permissions remain subject to your organisation's Soteria+ configuration and licensed user quota.
Troubleshooting SAML Sign-in
| Symptom | Likely cause |
|---|---|
| Connector not found appears immediately, or a blank page appears before reaching Entra | Contact Soteria+ support to confirm that the connection is complete and that the identity provider is permitted by the site's Content Security Policy. |
| Entra reports a reply URL, audience or issuer error | Confirm that Entra's Reply URL and Identifier (Entity ID) exactly match the values supplied by Soteria+ support. If they match, send the Entra error code and correlation details to support. |
| Authentication succeeds but Soteria+ cannot identify the user | Confirm that the claim names supplied to Soteria+ support exactly match those in Entra's Attributes & Claims page. Claim names are case-sensitive. Also confirm that the selected Entra source attributes contain values for the affected user. |
Maintaining the SAML Connection
Microsoft Entra signs SAML responses using a certificate associated with the enterprise application. Record its expiry date and arrange renewal with Soteria+ support before it expires. A certificate change must be coordinated so that Soteria+ trusts the new certificate when Entra begins using it; otherwise, users may be unable to sign in.
Microsoft recommends using SHA-256 for SAML signing unless an application specifically requires SHA-1. Do not change the signing option, signing algorithm, Entity ID, ACS URL or identity claims after testing without coordinating the change with Soteria+ support. For more information, see Certificate signing options in Microsoft Entra and Plan a single sign-on deployment.
Microsoft SharePoint
Soteria+'s SharePoint integration provides a robust and user-friendly solution for organisations to safeguard their valuable digital content stored in Microsoft 365 environments. This integration seamlessly connects SharePoint with Soteria+, enabling efficient management and long-term protection of records directly from within SharePoint.
This documentation will guide you through setting up the integration between Soteria+ and SharePoint, and also using the feature.
NB: Soteria+ SharePoint is an additional feature available to Soteria+ Enterprise customers. If you have not yet added SharePoint integration to your Soteria+ Enterprise contract and you would like to explore your options, please get in touch with us.
- Administrative access to your organisations SharePoint, or help from someone who does.
- Administrative access to Microsoft Entra, including permission to create an app registration, grant admin consent and create a credential.
- Permission to approve SharePoint Framework API access requests in the SharePoint admin centre.
- Permission to upload and deploy SharePoint extensions to your organisations SharePoint environment.
- An account on your organisations Soteria+ Enterprise system with a user-admin tier role.
- Assistance from the Soteria+ support team to configure the server-side integration.
- 30-45 minutes of time.
Security Setup
To connect your SharePoint system to Soteria+, you will first need to give both Soteria+ and SharePoint sufficient permissions to interact with each other securely.
Explanation
Both Soteria+ and SharePoint are protected by access controls that require explicit permission before users or connected services can perform actions.
The Soteria+ SharePoint integration uses Microsoft Graph to access data stored in SharePoint. When you preserve a file, the extension sends identifiers for the selected content rather than uploading the file through your browser. The integration service then retrieves the content directly through Graph.
This means the Preserve action can return quickly regardless of the size of the selection. Processing continues on the integration service, so your device does not need to remain connected while the content is transferred.
As a result, to access and retrieve your specified data, Soteria+ requires specific permissions to use your SharePoint data. Similarly, SharePoint requires specific permissions from Soteria+ in order for Soteria+ to allow your requests to be authenticated and actioned securely.
How authentication works
The integration uses one customer-specific Microsoft Entra application registration for two separate authentication flows:
- When a user selects Preserve, the SharePoint extension obtains a delegated Entra access token for the integration API. The API verifies the token's signature, tenant, audience and
Preservation.Uploadscope. The user's identity is taken from this verified token. - The integration service uses its own Entra credential to access Microsoft Graph. We recommend restricting its application access to approved SharePoint sites with
Sites.Selected. Customers who do not want to manage individual site grants can instead grant the application tenant-wideSites.ReadWrite.Allaccess.
The Soteria+ API key and the Entra client credential are held only by the integration service. They must not be entered into a SharePoint list, packaged with the extension or sent by the browser. The customer does not need to maintain a separate list of authorised users: Entra authenticates users from the customer tenant, normal use begins with content the user can access in SharePoint, and the integration service separately restricts requests to configured sites and, optionally, Document Libraries.
Registering the Soteria+ SharePoint Integration in Entra
- Sign in to the Microsoft Entra admin centre as an administrator and select the correct tenant.
- Go to Identity → Applications → App registrations and select New registration.
- Enter a descriptive name, such as
Soteria+ SharePoint Integration. - Select Accounts in this organisational directory only. No redirect URI is required.
- Select Register, then record the Application (client) ID and Directory (tenant) ID from the Overview page.
- Open Manifest, set
requestedAccessTokenVersionto2, and save the manifest.
Exposing the integration API
In the new app registration:
- Open Expose an API.
- Set the Application ID URI to
api://<application-client-id>, replacing the placeholder with the Application (client) ID recorded above. - Select Add a scope and use
Preservation.Uploadas the scope name. - Set Who can consent? to Admins only.
- Enter admin consent text explaining that the permission allows signed-in users to submit selected SharePoint content to Soteria+, enable the scope, and save it.
The complete delegated permission will be shown as api://<application-client-id>/Preservation.Upload.
Granting Microsoft Graph access
The integration service needs application access to retrieve content and update the PreservationStatus field in the enabled SharePoint sites. Choose one of the following permission models. Do not add both unless there is a specific reason to do so.
Option 1: Restrict access to selected sites (recommended)
- In the app registration, open API permissions.
- Select Add a permission → Microsoft Graph → Application permissions.
- Add
Sites.Selected. - Select Grant admin consent for the tenant.
Sites.Selected does not grant access to any site on its own. An administrator must separately grant the application write access to each site where the integration will be used. The Soteria+ support team can help perform this step. Using Microsoft Graph, send:
POST https://graph.microsoft.com/v1.0/sites/{site-id}/permissions
Content-Type: application/json
with the following body:
{
  "roles": ["write"],
  "grantedToIdentities": [
    {
      "application": {
        "id": "<application-client-id>",
        "displayName": "Soteria+ SharePoint Integration"
      }
    }
  ]
}
You can obtain the site ID with GET https://graph.microsoft.com/v1.0/sites/<tenant>.sharepoint.com:/sites/<site-name> and verify the completed assignment with GET https://graph.microsoft.com/v1.0/sites/{site-id}/permissions. The account making these requests must have sufficient Microsoft Graph administrative permission. Repeat the site-level grant for every SharePoint site where the integration will be enabled.
Option 2: Allow access to all SharePoint sites
If your organisation prefers not to manage site-level grants:
- In the app registration, open API permissions.
- Select Add a permission → Microsoft Graph → Application permissions.
- Add
Sites.ReadWrite.All. - Select Grant admin consent for the tenant.
This permission allows the integration application to read and write content across all SharePoint site collections in the tenant, so no separate site assignment is required. The integration service will still reject submissions from sites that the Soteria+ support team has not configured, but the Entra application credential itself has tenant-wide SharePoint access.
Creating the backend credential
Create a client secret that the integration service can use for its Microsoft Graph application access:
- In the app registration, open Certificates & secrets.
- Select New client secret, give it a descriptive name and choose an appropriate expiry period.
- Copy the client-secret value immediately. It is displayed only once.
Transfer the tenant ID, application ID and credential to the Soteria+ support team using the secure method they provide. Do not email an unencrypted client secret and do not place the credential in SharePoint. The support team will also configure the Soteria+ API key, allowed SharePoint origin, allowed site ID and, if required, allowed Document Library drive IDs on the integration service.
Creating the SharePoint configuration list
On every site where the integration is enabled:
- Log in to your SharePoint environment.
- Select the site from which you would like to use the Soteria+ integration.
- Find the "Create" button in the left-hand navigation panel and select a new "List".
You must call the list soteria-details.
Next, you must add columns to the list for the following fields:
ApiApplicationId: Single line of text containing the Entra Application (client) ID.IntegrationApiUrl: Single line of text containing the HTTPS URL supplied by the Soteria+ support team, for examplehttps://integration.example.org/api/sharepoint.Active: Choice field withActiveandInactiveoptions.
Add one item containing the Application (client) ID and integration API URL, then set Active to Active. If more than one item is active, the extension uses the most recently created one.
Restrict editing of this list to site administrators. The list contains no Soteria+ API key or client secret, but changing its values can redirect requests or stop the integration working.
If you are upgrading an older installation, remove the Soteria+ API key from the SharePoint list after all sites have been upgraded to the new extension. Ask the Soteria+ support team to rotate the exposed key and store the replacement only on the integration service.
Installing the SharePoint Extension
When you add the SharePoint integration to your Soteria+ enterprise contract, you will be provided a SharePoint extension package that you can install in your SharePoint environment.
To install the SharePoint extension, follow the instructions below:
- Log in to your SharePoint environment.
- Navigate to the SharePoint app catalog, which can be found at the url: www.yourorganisation.sharepoint.com/sites/appcatalog
- From the app catalog, select the "Apps for SharePoint" button.
- Next, you can simply drag and drop the provided SharePoint extension package into the list of installed extensions.
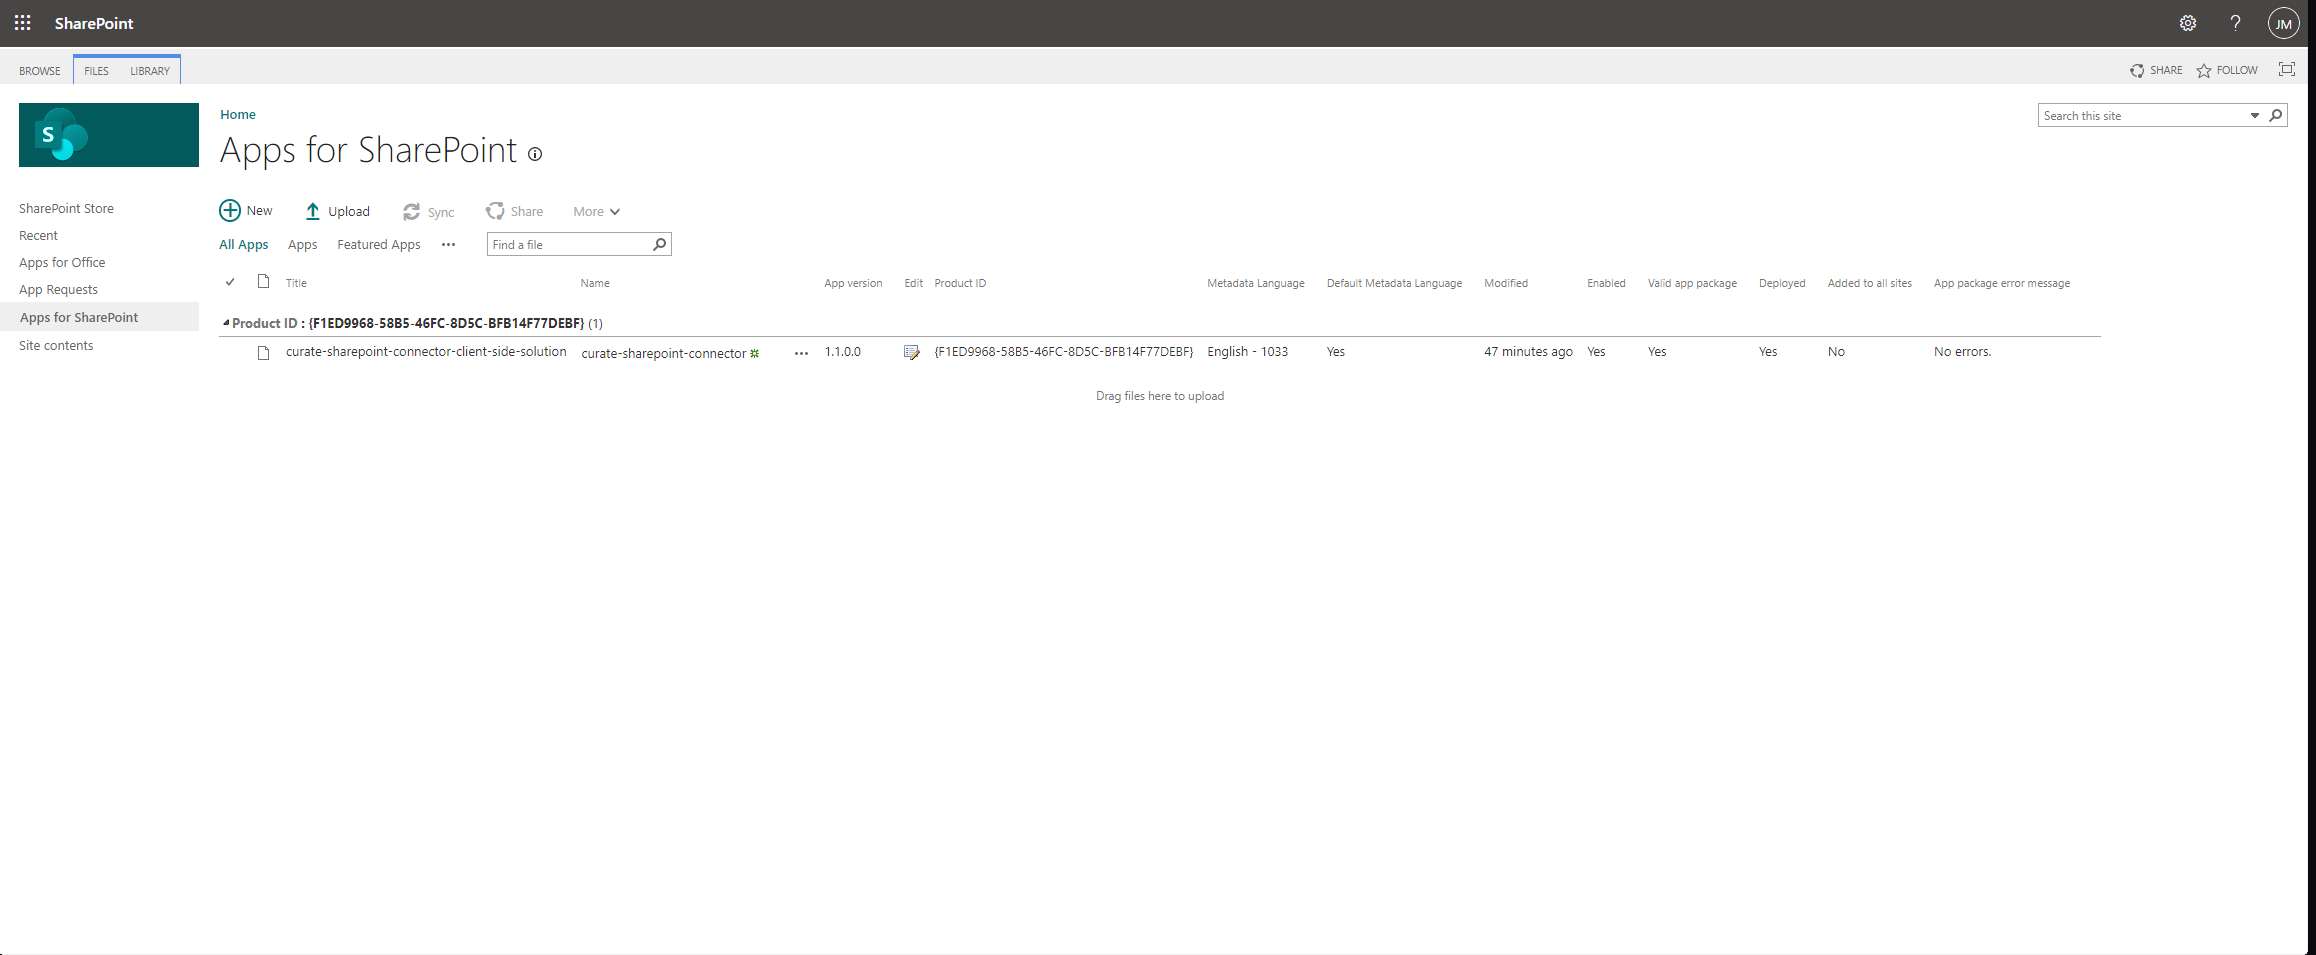
After a brief wait, SharePoint will prompt you to deploy the extension. It will ask whether you want to enable it for all sites automatically. Leave this option unselected unless tenant-wide deployment has been explicitly agreed.
Once the extension has been installed, you will be able to see the Soteria+ integration in the SharePoint app catalog we navigated to earlier. You should see "yes" underneath the "Enabled", "Valid app package" and "Deployed" columns, "No" under the "Added to all sites" column, and "No errors" under the "App package error message" column. This confirms that the extension has been successfully installed.
Uploading and deploying the package also creates a pending SharePoint Framework API permission request; it does not approve that permission automatically. In the SharePoint admin centre, open Advanced → API access, locate Soteria+ SharePoint Integration / Preservation.Upload, and approve it. This allows the extension to request a delegated access token for the integration API on behalf of the signed-in user.
The App Catalog deployment and site installation serve different purposes: deployment makes the package available and creates the API request, while adding the app to a site enables the extension on that site. If tenant-wide deployment was selected, the separate site-installation step below is not required.
Adding the SharePoint extension to your site
To add the Soteria+ integration to your site, follow the instructions below:
- Log in to your SharePoint environment.
- Select the site from which you would like to use the Soteria+ integration.
- Find and select the "Site Contents" menu from the main site areas navigation strip.
You should find the Soteria+ SharePoint extension in the list of available site content.
You can now simply select the Soteria+ SharePoint extension and click the "Add" button. This will add the Soteria+ SharePoint extension to your site.
At this point, it's a good idea to perform a hard-refresh in your web-browser by holding control/command, shift and pressing r.
To check that the installation worked as expected, you can now navigate to one of the Document Libraries you have set up in your SharePoint site. Once there, you should be able to select an item or multiple items and you will see the "Preserve" button in the SharePoint ribbon.
Adding the Status Column to your Document Library
To receive updates about the status of your deposits, you will need to add a new column to your Document Library. To add the column, follow these steps:
- Navigate to the Document Library/s in SharePoint from which you would like to send files to Soteria+.
- Click the "Add Column" button at the far right of the document list header.
- In the "New" dialog box, select "Single line of text" from the list of type options.
- Name the column
PreservationStatusand save it. The internal column name must be exactlyPreservationStatus; after saving, you may change its displayed name to Preservation Status if preferred.
Verifying the installation
- Open an enabled Document Library and select a test file.
- Confirm that the Preserve command appears, then select it.
- Confirm that SharePoint accepts the request and that the
PreservationStatusvalue changes while the item is processed. - Confirm that the content appears in the SharePoint Uploads folder in Soteria+ and that the final SharePoint status indicates success.
If the test fails, provide the time of the attempt, SharePoint site URL, affected item name and displayed error to the Soteria+ support team. Never send a client secret or Soteria+ API key in a support email.
Sending files to Soteria+ via SharePoint
To send a file to Soteria+ from SharePoint, select the items you would like to send, then select the Preserve button in the SharePoint ribbon. Provided the SharePoint configuration list, Entra permissions and server-side settings are complete, the integration will accept the submission and process it in the background.
The Preservation Status column reports progress and the final outcome. If SharePoint reports that the sign-in could not be authenticated, check that the delegated API permission has been approved. If it reports that the site or tenant is not enabled, ask the Soteria+ support team to confirm the tenant, site ID and optional drive restrictions configured on the integration service.
Receiving files from Soteria+ via SharePoint
Once you or someone in your organisation has sent some content from SharePoint to Soteria+ using the Soteria+ SharePoint integration, it will automatically appear in your Soteria+ Quarantine space in the "SharePoint Uploads" folder. This folder will be created automatically when a user deposits content into Soteria+ from SharePoint. If you delete this folder, it will simply be recreated the next time you deposit content into Soteria+ from SharePoint.
Each upload from SharePoint to Soteria+ will be scoped to a unique folder within the SharePoint Uploads folder. This folder will be named with the date and time the upload was initiated. Each scoped folder will contain the entire selection of data that was uploaded in that operation. For example, if a user selects and chooses the "Preserve" option on a single file, the file will be deposited into a folder with the date and time within the "SharePoint Uploads" folder. If they instead select several files, and even folders, all of those items will be grouped into a single folder within the "SharePoint Uploads" folder.
Each scoped folder will also be tagged with a piece of metadata that lists the registered name and email address of the user who initiated the upload. This is to help you keep track of who uploaded what to Soteria+.